Flow and Adaptive Cards - Sending an Outlook Actionable Message - Post 2
Finish the series to send an adaptive card to your users and receive a response back.

In the first post we discussed how to create an actionable message and send that to a user through outlook using Flow. I am now going to demonstrate on how to receive the response from the user and take action on it in Flow.
Edit your card
We need to wire up the Action.HTTP in our card to make'Submit Response' button do something, if you used my JSON from the previous example you only need to add the URL to send the response to. To get this URL we need to make another flow to capture the response.
Head over to Microsoft Flow and create a new flow.
- Add the 'When a HTTP request is received' trigger.
- In the trigger card select 'Use sample payload to generate schema' and enter in a sample of the JSON data we are expecting to get when the card is submitted. After clicking done the sample data is used to fill out the body JSON.
{
	"response": "text",
	"suggestionID": 3
}
3. Add create SharePoint List Item step to your flow and set that up to insert an item with the ID and response received from the user.
4. Save your flow and copy the URL that is generated. You need to paste this URL into JSON card that gets sent to your user.
<script type="application/adaptivecard+json">

{
    "type": "AdaptiveCard",
    "body": [
        {
            "type": "TextBlock",
            "size": "Medium",
            "weight": "Bolder",
            "text": "Additional Feedback Required"
        },
        {
            "type": "TextBlock",
            "text": "",
            "wrap": true
        },
        {
            "type": "FactSet",
            "facts": [
                {
                    "title": "Suggestion ID:",
                    "value": ""
                },
                {
                    "title": "Respond By:",
                    "value": ""
                }
            ]
        },
        {
            "type": "Input.Text",
            "placeholder": "Response",
            "id": "responseText",
            "isMultiline": true,
            "separator": true
        }
    ],
    "$schema": "http://adaptivecards.io/schemas/adaptive-card.json",
    "version": "1.0",
    "actions": [
        {
            "type": "Action.Http",
            "title": "Submit Response",
            "method": "POST",
            "id": "submit",
            "url": "",
            "body": "{\"response\":\"{{responseText.value}}\",\"suggestionID\":@{triggerBody()?['suggestionID']}}",
            "headers": [
                {
                    "name": "Authorization",
                    "value": ""
                },
                {
                    "name": "Content-type",
                    "value": "application/json"
                }
            ]
        }
    ]
}
</script>
5. Head back to the new flow you made and you need to add a compose step to create the card that is sent back to your user. Below is a simple card saying 'your response has been received'
{
  "type": "AdaptiveCard",
  "body": [
    {
      "type": "TextBlock",
      "size": "Medium",
      "weight": "Bolder",
      "text": "Thank you for your feedback!"
    },
    {
      "type": "TextBlock",
      "text": "Your response has been submitted successfully!"
    }
  ],
  "$schema": "http://adaptivecards.io/schemas/adaptive-card.json",
  "version": "1.0"
}
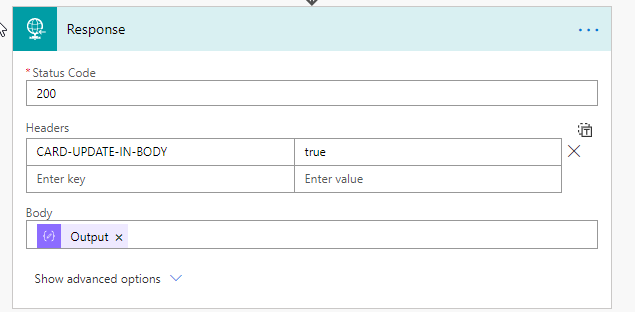
6. After the compose step add a response step here we will send a status code back to the submitter and updated the card. The step should look like below using the output from the previous compose step as the body.

Test it out!
Alright you should have a functioning card that your users can submit a response, save it to a SharePoint list and update the user that the response has been received. You can do a number of neat things with this functionality!